The following TechNet Article talks about the SQL Server collation for the SharePoint databases http://technet.microsoft.com/en-us/library/cc288970.aspx#section1
“The SQL Server collation must be configured for case-insensitive. The SQL Server database collation must be configured for case-insensitive, accent-sensitive, Kana-sensitive, and width-sensitive. This is to ensure file name uniqueness consistent with the Windows operating system.”
However, we do not support changing the default collation (Latin1_General_CI_AS_KS_WS) for SharePoint databases to any other collations (CI, AS, KS, WS).
We support any CI collation for the SQL instance (for master, tempdb databases). However we recommend using Latin1_General_CI_AS_KS_WS as the instance default collation (master, tempdb databases).
http://support.microsoft.com/kb/2008668
So what if you have a different collation and you are in an unspported situation. This article will provide you to change Database Collation to supported collation of “Latin1_General_CI_AS_KS_WS”
First If you have also different collation for the SQL instance (for master, tempdb databases) and some of other databases which are not SharePoint related will require this you have to setup and install another SQL Server Instance with correct collation . After that you can use database attach method to transfer SharePoint Content Database to new SQL Server. Moving SharePoint Farm to another SQL Server instance is out of this article scope. In this article we talked about only one content database have different collation from supported Latin1_General_CI_AS_KS_WS and assume that for the SQL instance (for master, tempdb databases) you have correct configuration.
You wann check following articles
Setting and Changing the Server Collation
http://technet.microsoft.com/en-us/library/ms179254(v=SQL.100).aspx
1) Don’t Forget to backup your original Content Database for any further problems. and you need a maintenance time to make this operation .For minimize outage you may change the problematic Content Database in “Read Only” Mode. We always suggest to test this in a test enviroment before appling to any Production Farm.
2) Open your SharePoint Central Administration -> Application Management -> Manage Content Databases section.
3) Create an empty new Content Database for any web Application and deattach this content database after you have created.
For more information about Add a content database (SharePoint Server 2010)
http://technet.microsoft.com/en-us/library/cc825314(v=office.14).aspx
Attach or detach content databases (SharePoint Server 2010) please check following article.
http://technet.microsoft.com/en-us/library/ff628582(v=office.14).aspx
4) Usually SharePoint 2010 creates new content databases with correct collation “Latin1_General_CI_AS_KS_WS” . If not, you need to rebuild another SharePoint Farm or create a content database on another SharePoint server which must be same build level with correct collation than move this content database to your actual farm by using your SQL knowledge.
We are doing this ; because we want to sure that we have a content database with correct Schema.
You can check Collation in SQL Server Management Studio by right clicking on Content Database and selecting “Properties”

5) Clear all table data in newly created content Database . You can use following script to generate Truncate Tables commands:
Use WSS_Content_New
Declare @TableName as nvarchar(max)
Declare tablecursor cursor for select name from sys.objects where type = ‘U’ order by name
open tablecursor
Fetch next from tablecursor into @TableName
WHILE @@FETCH_STATUS =0
BEGIN
Print ‘Truncate Table ‘ + @TableName
Fetch next from tablecursor into @TableName
END
6) Copy/Paste Generated commands to another SSMS window and run for newly created content database (In example we are using “WSS_Content_New”). If you do it correctly all the data in new content database should be cleared. (Don’t Delete Tables or Don’t try to delete and recreate tables by yourself. We need to clear data in tables only)
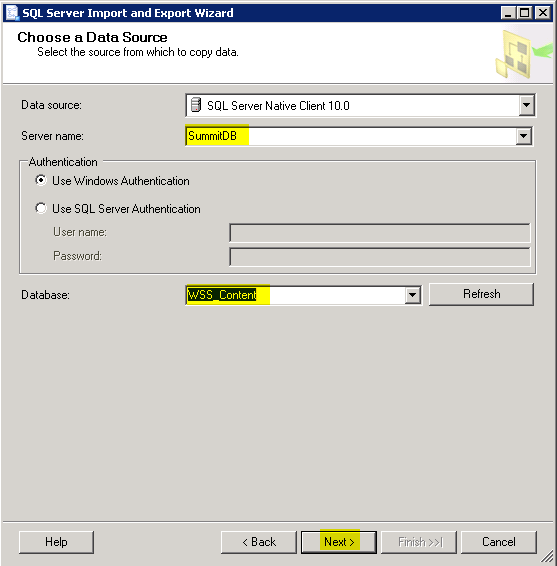
7) Click Start-> All Programs -> Microsoft SQL Server 2008R2 -> “Import and Export Data (32 bit)”
8) Select your SQL Server and Old Content Database as Source
9) Select new content database as target.

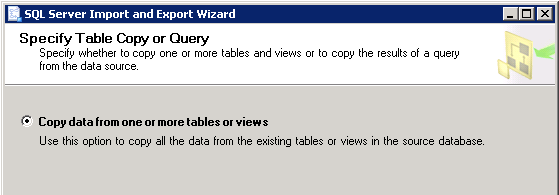
10) Select “Copy data from one or more tables or views”

11) Select each time for 5 tables until you complete all tables. It will provide you detect copy errors (you will get some.)
Do not select any VIEWS !!! only tables

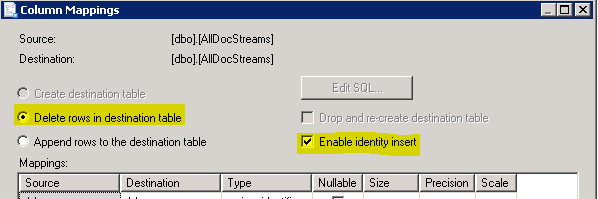
12 ) For Each Selected Tables apply following . Mark the tables one by one and click Edit Bindings.

13) Select “Delete Rows in destination table” and select “Enable identity insert” . (Dont forget to do this all selected 5 tables)

14 ) Some of the tables has calculated columns. You need to do some extra operation for tables which contains “Computed Columns” . For Example “AllDocs” Table.
For more information about “Computed Columns” please check following article.
http://msdn.microsoft.com/en-us/library/ms191250(v=SQL.105).aspx
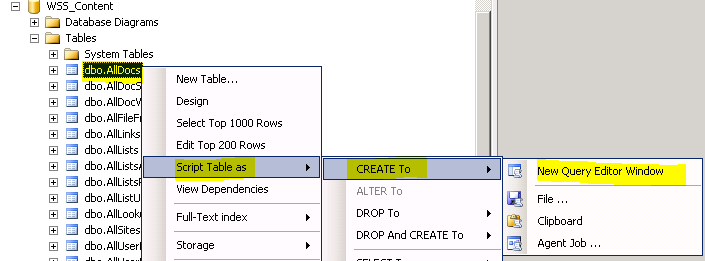
You can find these kind of tables by checking their “create” scripts.

For example : In AllDocs Table;
CREATE TABLE [dbo].[AllDocs](
[Id] [uniqueidentifier] NOT NULL,
[SiteId] [uniqueidentifier] NOT NULL,
[DirName] [nvarchar](256) NOT NULL,
[LeafName] [nvarchar](128) NOT NULL,
[WebId] [uniqueidentifier] NOT NULL,
[ListId] [uniqueidentifier] NULL,
[DoclibRowId] [int] NULL,
[Type] [tinyint] NOT NULL,
[SortBehavior] [tinyint] NOT NULL,
[Size] [int] NULL,
[ETagVersion] AS (case when [InternalVersion] IS NULL then NULL else ([InternalVersion]+[BumpVersion]*(256))/(256) end),
[EffectiveVersion] AS (case when [InternalVersion] IS NULL then NULL else [InternalVersion]+[BumpVersion]*(256) end),
[InternalVersion] [int] NULL,
[BumpVersion] [tinyint] NOT NULL,
[UIVersion] [int] NOT NULL,
[Dirty] [bit] NULL,
[ListDataDirty] [bit] NOT NULL,
[CacheParseId] [uniqueidentifier] NULL,
[DocFlags] [int] NULL,
[ThicketFlag] [bit] NULL,
[CharSet] [int] NULL,
[ProgId] [nvarchar](255) NULL,
[TimeCreated] [datetime] NOT NULL,
[TimeLastModified] [datetime] NOT NULL,
[NextToLastTimeModified] [datetime] NULL,
[MetaInfoTimeLastModified] [datetime] NULL,
[TimeLastWritten] [datetime] NULL,
[DeleteTransactionId] [varbinary](16) NOT NULL,
[SetupPathVersion] [tinyint] NOT NULL,
[SetupPath] [nvarchar](255) NULL,
[SetupPathUser] [nvarchar](255) NULL,
[CheckoutUserId] [int] NULL,
[CheckoutDate] [datetime] NULL,
[CheckoutExpires] [datetime] NULL,
[VersionCreatedSinceSTCheckout] [bit] NOT NULL,
[LTCheckoutUserId] AS (case when ([DocFlags]&(32))=(32) then [CheckoutUserId] end),
[VirusVendorID] [int] NULL,
[VirusStatus] [int] NULL,
[VirusInfo] [nvarchar](255) NULL,
[MetaInfo] [dbo].[tCompressedBinary] NULL,
[MetaInfoSize] [int] NULL,
[MetaInfoVersion] [int] NOT NULL,
[UnVersionedMetaInfo] [dbo].[tCompressedBinary] NULL,
[UnVersionedMetaInfoSize] [int] NULL,
[UnVersionedMetaInfoVersion] [int] NULL,
[WelcomePageUrl] [nvarchar](260) NULL,
[WelcomePageParameters] [nvarchar](max) NULL,
[IsCurrentVersion] [bit] NOT NULL,
[Level] [tinyint] NOT NULL,
[CheckinComment] [nvarchar](1023) NULL,
[AuditFlags] [int] NULL,
[InheritAuditFlags] [int] NULL,
[DraftOwnerId] [int] NULL,
[UIVersionString] AS ((CONVERT([nvarchar],[UIVersion]/(512),0)+’.’)+CONVERT([nvarchar],[UIVersion]%(512),0)),
[ParentId] [uniqueidentifier] NOT NULL,
[HasStream] AS (case when [Type]=(0) AND ([DocFlags]&(256))=(256) AND [SetupPath] IS NULL OR [SetupPath] IS NOT NULL AND ([DocFlags]&(64))=(64) then (1) else (0) end),
[ScopeId] [uniqueidentifier] NOT NULL,
[BuildDependencySet] [varbinary](max) NULL,
[ParentVersion] [int] NULL,
[ParentVersionString] AS ((CONVERT([nvarchar],[ParentVersion]/(512),0)+’.’)+CONVERT([nvarchar],[ParentVersion]%(512),0)),
[TransformerId] [uniqueidentifier] NULL,
[ParentLeafName] [nvarchar](128) NULL,
[IsCheckoutToLocal] AS (case when ([DocFlags]&(512))=(512) then (1) else (0) end),
[CtoOffset] [smallint] NULL,
[Extension] AS (case when charindex(N’.’,[LeafName] collate Latin1_General_BIN)>(0) then right([LeafName],charindex(N’.’,reverse([LeafName]) collate Latin1_General_BIN)-(1)) else N” end),
[ItemChildCount] [int] NOT NULL,
[FolderChildCount] [int] NOT NULL,
[FileFormatMetaInfo] [varbinary](max) NULL,
[FileFormatMetaInfoSize] [int] NOT NULL,
[FFMConsistent] [bit] NULL,
[ContentVersion] [int] NOT NULL,
[ListSchemaVersion] [int] NULL,
[ClientId] [varbinary](16) NULL,
The Bold Columns are Computed Columns for AllDocs table
- ETagVersion
- EffectiveVersion
- LTCheckoutUserId
- UIVersionString
- HasStream
- ParentVersionString
- Extension
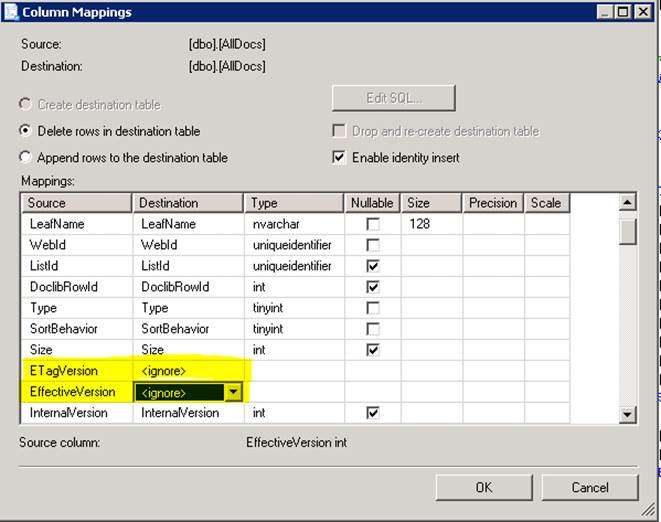
15) For Every Computed Column for every Table you have to select “Destination” value as “<ignore>”

16) After Mapping Configuration Click Next and Finish and if everything is ok SQL “Import and Export Tool” able to copy data between selected tables.
Note: It may give some warnings than you can ignore them . But if it is giving any error go back and check all configuration again.
Note: All Rows must me transfered dont forget to check row counts.Any missing row will make your System unstable and unsupported state.
17) Copy all tables’ data to new content database. Check all tables row counts after you finished the operation again.
Important Note:You have to be very Careful, Any error , any missing row or any missing column data happens that indicates you could not have a supported database !!!
18) Deattach original content database from Web Application
19) Attached newly created content database to Web Application and test that everything is working fine.
Attach or detach content databases (SharePoint Server 2010) please check following article.
http://technet.microsoft.com/en-us/library/ff628582(v=office.14).aspx
Important Note: The data have already been transfered from old database will not be changed. Thats mean until this operation old data will remain in old collation. New added Data will applied as the new collation format. So dont expect that the if you have some character problems causing by unsupported collation will not be fixed by this operation. And Always test your System for a test environment before doing any action on Production.
To being on the safe side you may try create one more content database and after you complete change collaction operation , and move your all site collections by Move-SPSite Command.
http://technet.microsoft.com/en-us/library/ff607915.aspx